如何设计一个可扩展、可维护的 AI Agent 后台系统
引言
随着大语言模型的快速发展,AI Agent 成为连接 AI 能力与业务场景的关键桥梁。本文基于实际生产项目经验,分享如何设计一个面向业务的 Agent 后台架构,涵盖分层设计、领域建模、事件驱动、工具系统等。
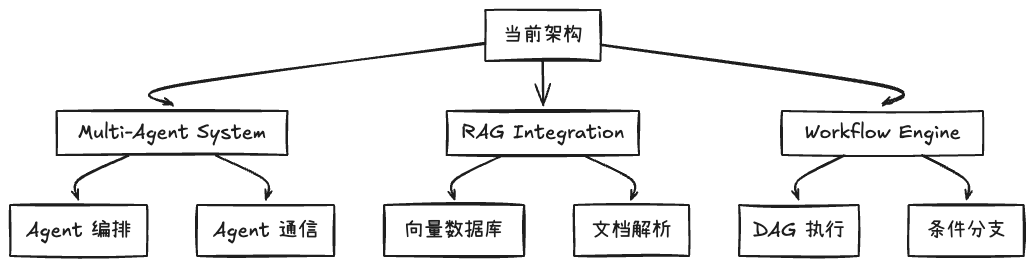
一、整体架构概览
1.1 架构原则
在设计 Agent 后台时,我们遵循以下核心原则:
- 关注点分离:清晰的分层架构,每层职责单一
- 依赖倒置:面向接口编程,降低耦合
- 领域驱动:以业务领域为核心,而非技术实现
- 可测试性:易于单元测试和集成测试
- 可扩展性:支持新功能的快速接入
1.2 四层架构模型
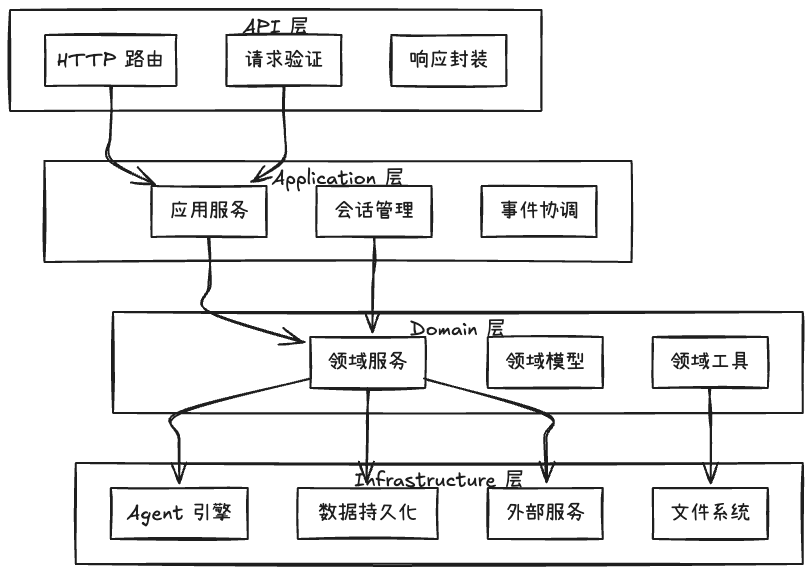
各层职责:
- API 层:处理 HTTP 请求,参数验证,响应格式化
- Application 层:编排业务流程,协调多个领域服务
- Domain 层:核心业务逻辑,领域模型和规则
- Infrastructure 层:技术实现细节,外部依赖封装
二、核心设计模式
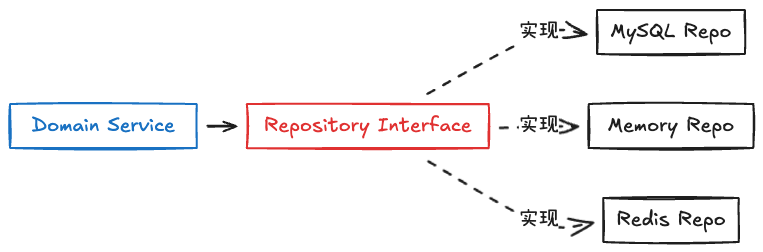
2.1 Repository 模式
使用 Repository 模式隔离数据访问逻辑,使领域层不依赖具体的存储实现。
关键设计点:
// 领域层定义接口
type UserSessionRepo interface {
    Create(ctx context.Context, session *UserSession) error
    UpdateStatus(ctx context.Context, sessionID string,
                 from []SessionStatus, to SessionStatus) (bool, error)
    ListByUser(ctx context.Context, userID string,
               sessionID string, limit int) ([]*UserSession, int64, error)
}

// 基础设施层实现
type UserSessionRepoImpl struct {
    db *gorm.DB
}

func (r *UserSessionRepoImpl) Create(ctx context.Context, session *UserSession) error {
    // MySQL 实现
}
优势:
- 领域层不依赖具体数据库
- 易于切换存储方案
- 便于单元测试(Mock Repository)
2.2 依赖注入模式
通过构造函数注入依赖,而非在内部创建,提高可测试性和灵活性。
// ❌ 不好的做法
type AgentExecutor struct {}

func (ae *AgentExecutor) Run() {
    repo := impl.NewUserSessionRepo(global.DB()) // 硬编码依赖
}

// ✅ 好的做法
type AgentExecutor struct {
    ctxRepo repo.LlmCtxRepo  // 注入接口
}

func NewAgentExecutor(ctx context.Context,
                      g *genkit.Genkit,
                      ctxRepo repo.LlmCtxRepo) *AgentExecutor {
    return &AgentExecutor{
        ctxRepo: ctxRepo,
    }
}
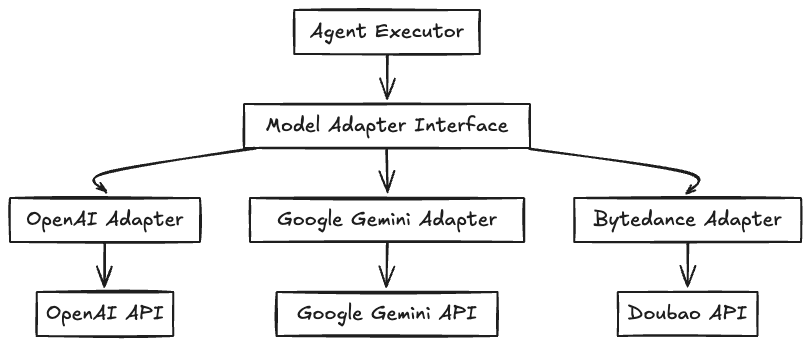
2.3 策略模式:多模型适配
支持多种 LLM 提供商(OpenAI、Google、本地模型等),使用策略模式统一接口。
三、Agent 执行引擎设计
3.1 Agent 执行流程
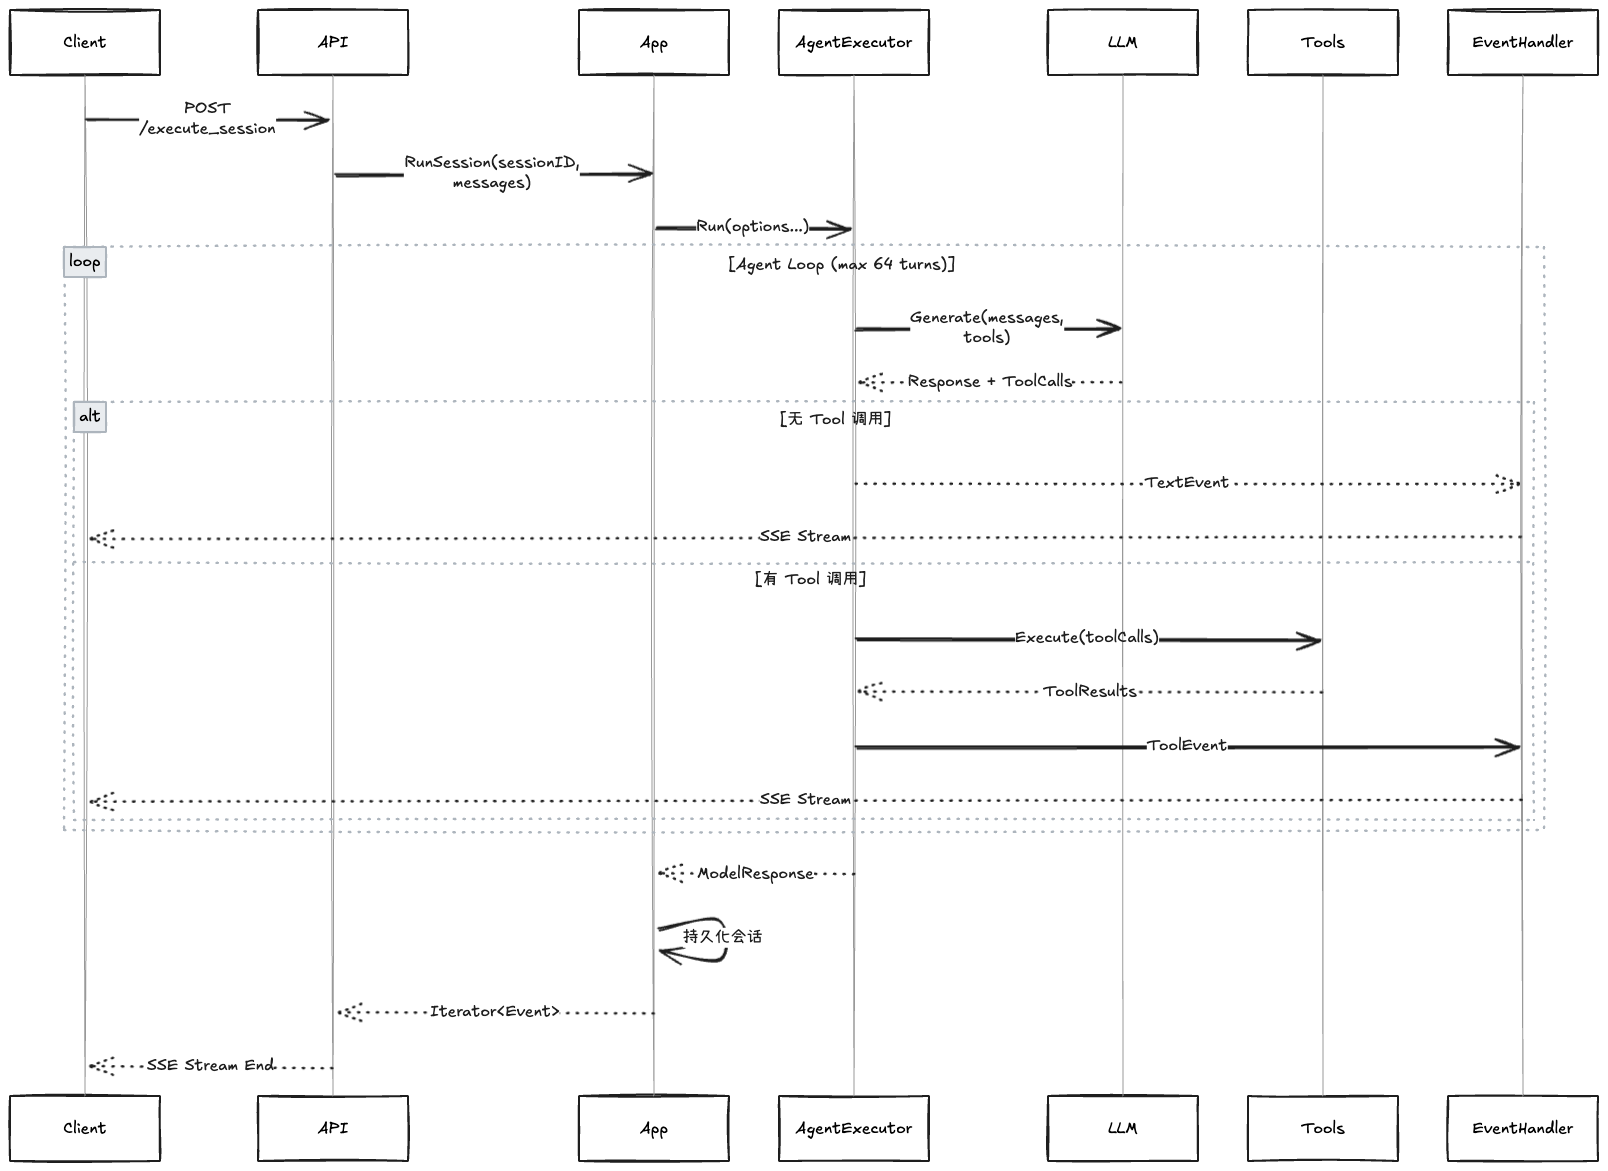
3.2 核心执行器设计
type AgentExecutor struct {
    ctx          context.Context
    g            *genkit.Genkit
    ctxRepo      repo.LlmCtxRepo
    emitter      *SpanAgentEventEmitter

    storedDialog []*ai.Message  // 历史对话
    inputDialog  []*ai.Message  // 当前输入
    sessionId    string
    tools        []tool.Tool
    toolExecutor *ToolExecutor
    maxTurns     int  // 防止无限循环
}

func (ae *AgentExecutor) Run(options ...RunAgentOption) (*ai.ModelResponse, error) {
    // 1. 加载配置
    ae.loadOptions(options...)

    // 2. 加载历史对话(如果有 sessionId)
    if ae.sessionId != "" {
        if err := ae.loadStoredDialogs(); err != nil {
            return nil, err
        }
    }

    // 3. 执行 Agent 循环
    modelResp, err := ae.runAgentLoop()

    // 4. 持久化新增对话
    if ae.sessionId != "" {
        return modelResp, ae.persistSession(modelResp)
    }

    return modelResp, nil
}
关键设计点:
- 会话持久化:支持多轮对话的上下文保持
- 最大轮次限制:防止 Tool 调用陷入无限循环
- 流式输出:实时反馈 Agent 思考过程
- 错误恢复:优雅处理 Tool 执行失败
3.3 事件驱动架构
使用事件系统解耦 Agent 执行与 UI 渲染:

事件类型设计:
const (
    // 文本事件
    TextTypeStart = "TEXT_START"  // 开始生成文本
    TextTypeDelta = "TEXT_DELTA"  // 增量文本
    TextTypeEnd   = "TEXT_END"    // 文本结束

    // 工具调用事件
    ToolCallTypeStart = "TOOL_CALL_START"
    ToolCallTypeDelta = "TOOL_CALL_DELTA"
    ToolCallTypeEnd   = "TOOL_CALL_END"

    // 工具结果事件
    ToolResultType = "TOOL_RESULT"

    // 运行状态事件
    RunStartType = "RUN_START"
    RunEndType   = "RUN_END"
    RunErrorType = "RUN_ERROR"
)
四、工具系统设计
4.1 Tool 接口设计
统一的 Tool 接口,支持类型安全和 Schema 生成:
type Tool interface {
    Name() string
    Description() string
    InputSchema() *jsonschema.Schema
    Execute(ctx context.Context, input any) (*ToolResult, error)
}

// 泛型 Tool 实现
type GenericTool[TInput, TOutput any] struct {
    name        string
    description string
    handler     func(ctx context.Context, input TInput) (*ToolResult[TOutput], error)
}
使用示例:
func WriteTool(ctx context.Context, fs filesystem.FileSystem) tool.Tool {
    return tool.NewTool[WriteParams, *WriteResult](
        "write",
        "写入文件内容",
        func(ctx context.Context, input WriteParams) (*tool.ToolResult[*WriteResult], error) {
            res, err := fs.Write(ctx, &filesystem.WriteParams{
                FilePath: input.FilePath,
                Content:  []byte(input.Content),
            })
            if err != nil {
                return &tool.ToolResult[*WriteResult]{
                    Text: fmt.Sprintf("发生错误:%s", err.Error()),
                }, nil
            }
            return &tool.ToolResult[*WriteResult]{
                Text: fmt.Sprintf("写入完成。%d Bytes", res.Size),
            }, nil
        },
    )
}
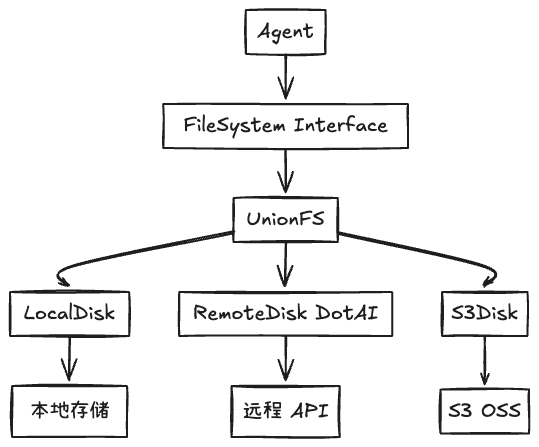
4.2 文件系统抽象
使用虚拟文件系统(VFS)统一本地和远程文件操作:
挂载点配置:
fs_view:
  session:
    mount_conf:
      - mount: /workspace      # 挂载路径
        disk_name: workspace   # 磁盘名称
        remote: /              # 远程路径
        read_only: false       # 读写权限
        output_path: true      # 是否为输出路径

      - mount: /userinfo
        disk_name: userinfo
        remote: /
        read_only: true        # 只读
优势:
- Agent 无需关心文件来源(本地/远程/云存储)
- 统一的权限控制(只读/读写)
- 支持多数据源组合(UnionFS)
4.3 Tool 分类设计

五、会话管理与状态机
5.1 会话状态设计
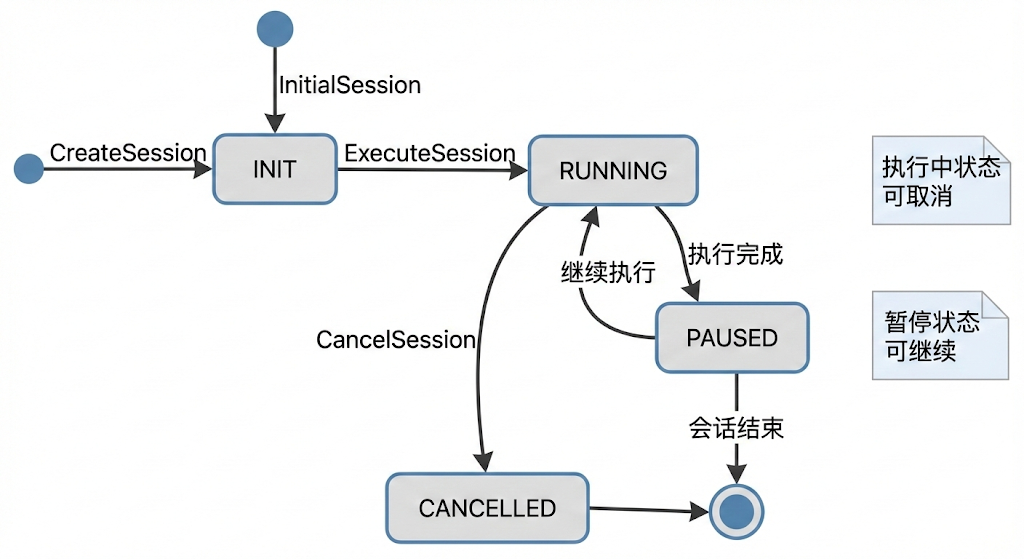
状态转换控制:
// 只允许特定状态转换
func (r *UserSessionRepo) UpdateStatus(
    ctx context.Context,
    sessionID string,
    from []SessionStatus,  // 允许的原状态
    to SessionStatus,       // 目标状态
) (bool, error) {
    result := r.db.WithContext(ctx).
        Model(&UserSession{}).
        Where("session_id = ? AND status IN ?", sessionID, from).
        Update("status", to)

    return result.RowsAffected > 0, result.Error
}
5.2 会话取消机制
使用消息代理实现优雅取消:
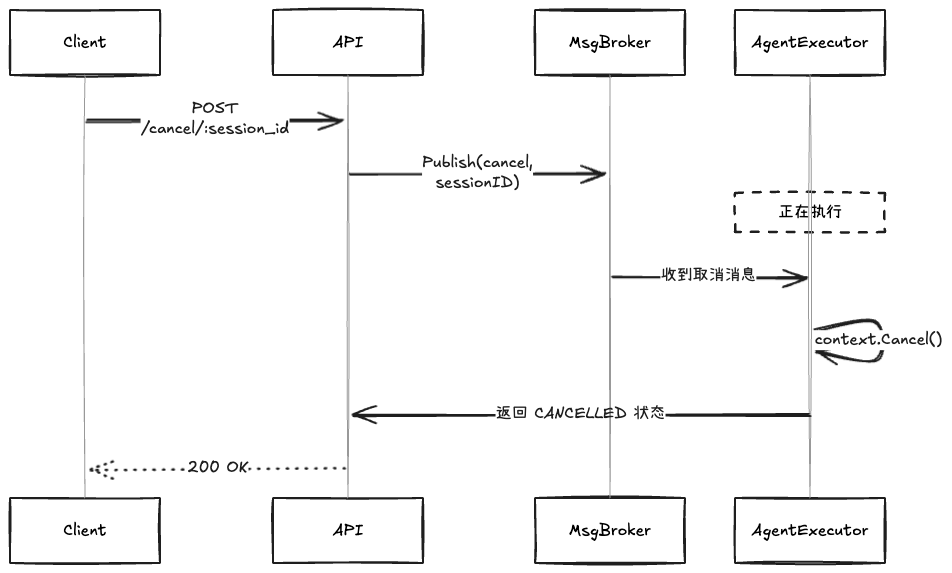
实现:
func (app *App) RunSession(ctx context.Context, sessionID string, msg []*ai.Message) {
    // 1. 监听取消消息
    ctx, cancel := context.WithCancel(ctx)
    go func() {
        consumer, _ := app.msgBroker.NewConsumer(CancelChannelId)
        for {
            next, _, _ := consumer.Next(ctx)
            if val, ok := next.(string); ok && val == sessionID {
                app.userSessionRepo.UpdateStatus(ctx, sessionID,
                    []repo.SessionStatus{repo.RUNNING}, repo.CANCELLED)
                cancel()  // 取消 context
                return
            }
        }
    }()

    // 2. 执行 Agent(会检查 ctx.Done())
    agent.Run(ctx, msg, eventChan)
}
六、性能优化与可观测性
6.1 Span 追踪
使用 Span 追踪 Agent 执行过程:
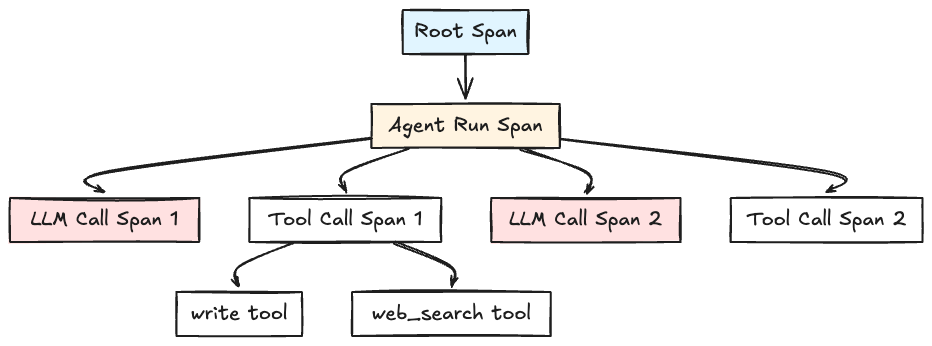
Span 上下文传递:
type ExecSpan struct {
    ID  string `json:"id"`       // 当前 Span ID
    Par string `json:"par"`      // 父 Span ID
}

// Context 中注入 Span
ctx = utils.WithSpan(ctx, span)

// 子 Span 继承父 Span
childSpan := models.ExecSpan{
    ID:  utils.NewSpanID(),
    Par: parentSpan.ID,
}
6.2 流式输出优化
使用增量事件减少延迟:
// 文本增量事件
func (ae *AgentExecutor) OnChunk(chunk *ai.ModelResponseChunk) error {
    for _, part := range chunk.Content {
        if part.Kind == ai.PartText {
            ae.eventChan <- models.SpanAgentEvent{
                Span: span,
                Data: models.NewTextDelta(part.Text),  // 增量文本
            }
        }
    }
}
前端渲染:
TEXT_START:创建消息容器TEXT_DELTA:追加文本内容(实时显示)TEXT_END:标记消息完成
6.3 数据库优化
索引设计:
-- 会话查询索引
CREATE INDEX idx_user_sessions_user_id ON user_sessions(user_id, created_at DESC);

-- 事件查询索引
CREATE INDEX idx_ui_events_session_seq ON ui_events(session_id, seq);

-- 上下文消息索引
CREATE INDEX idx_llm_ctx_session_seq ON llm_context(session_id, seq);
分页查询:
func (r *UserSessionRepo) ListByUser(
    ctx context.Context,
    userID string,
    lastSessionID string,  // 游标
    limit int,
) ([]*UserSession, int64, error) {
    query := r.db.WithContext(ctx).
        Where("user_id = ?", userID)

    // 游标分页
    if lastSessionID != "" {
        var lastSession UserSession
        r.db.Where("session_id = ?", lastSessionID).First(&lastSession)
        query = query.Where("created_at < ?", lastSession.CreatedAt)
    }

    var sessions []*UserSession
    err := query.Order("created_at DESC").Limit(limit).Find(&sessions).Error

    return sessions, count, err
}
七、安全性设计
7.1 文件系统权限控制
type MountConfig struct {
    Mount      string `yaml:"mount"`       // 挂载路径
    DiskName   string `yaml:"disk_name"`   // 磁盘名称
    ReadOnly   bool   `yaml:"read_only"`   // 只读权限
    OutputPath bool   `yaml:"output_path"` // 是否为输出路径
}

// 权限检查
func (fs *UnionFS) Write(ctx context.Context, params *WriteParams) (*WriteResult, error) {
    mount := fs.findMount(params.FilePath)
    if mount.ReadOnly {
        return nil, errors.New("permission denied: mount is read-only")
    }
    // 执行写入
}
7.2 用户隔离
每个会话绑定用户 ID 和独立的工作目录:
type SessionView struct {
    userID    string
    sessionID string
    fs        filesystem.FileSystem
}

func NewSessionView(ctx context.Context, sessionID string) (*SessionView, error) {
    // 为会话创建独立的文件系统视图
    fs, err := filesystem.NewSessionFS(sessionID, mountConfigs)
    return &SessionView{
        sessionID: sessionID,
        fs:        fs,
    }
}
7.3 认证与授权
// 从请求头提取认证信息
ctx = dotai.WithAuth(ctx, dotai.Auth{
    Token: c.GetHeader("token"),
    UID:   c.GetHeader("uid"),
    Email: c.GetHeader("email"),
})

// 在 FileSystem 调用远程 API 时使用
auth, ok := dotai.AuthFromContext(ctx)
if ok {
    req.Header.Set("Authorization", "Bearer "+auth.Token)
}
八、测试策略
8.1 单元测试
使用 Mock Repository:
type MockUserSessionRepo struct {
    sessions map[string]*UserSession
}

func (m *MockUserSessionRepo) Create(ctx context.Context, session *UserSession) error {
    m.sessions[session.SessionID] = session
    return nil
}

// 测试
func TestCreateSession(t *testing.T) {
    mockRepo := &MockUserSessionRepo{sessions: make(map[string]*UserSession)}
    app := &App{userSessionRepo: mockRepo}

    sessionID, err := app.CreateSession(ctx, "user1", "test session")
    assert.NoError(t, err)
    assert.NotEmpty(t, sessionID)
}
8.2 集成测试
使用测试容器:
func TestAgentExecutorIntegration(t *testing.T) {
    // 启动测试数据库
    db := setupTestDB(t)
    defer db.Close()

    // 创建真实的 Repository
    repo := impl.NewUserSessionRepo(db)

    // 测试完整流程
    agent := NewAgentExecutor(ctx, genkit, repo)
    resp, err := agent.Run(WithSessionID("test-session"))

    assert.NoError(t, err)
    assert.NotNil(t, resp)
}
8.3 压力测试
func BenchmarkAgentRun(b *testing.B) {
    agent := setupAgent()

    b.ResetTimer()
    for i := 0; i < b.N; i++ {
        agent.Run(WithMessages([]*ai.Message{
            {Role: ai.RoleUser, Content: []*ai.Part{ai.NewTextPart("test")}},
        }))
    }
}
9. 扩展性考虑